修改dataDir的myid为 各自的
集群
server.1=master:2888:3888
server.2=slave1:2888:3888
server.3=slave2:2888:3888
port1: 从机器(follower)连接到主机器(leader)的端口号
port2: leadership选举的端口号

./zkServer.sh start ../conf/zoo0.cfg

连接 bin/zkCli.sh -server slave1:2181

配置文件的说明:

tickTime :基本事件单元,以毫秒为单位。这个时间是作为 Zookeeper 服务器之间或客户端与服务器之间维持心跳的时间间隔,也就是每个 tickTime 时间就会发送一个心跳。
dataDir :存储内存中数据库快照的位置,顾名思义就是 Zookeeper 保存数据的目录,默认情况下,Zookeeper 将写数据的日志文件也保存在这个目录里。
clientPort :这个端口就是客户端连接 Zookeeper 服务器的端口,Zookeeper 会监听这个端口,接受客户端的访问请求。
initLimit:这个配置项是用来配置 Zookeeper 接受客户端初始化连接时最长能忍受多少个心跳时间间隔数,当已经超过 5 个心跳的时间(也就是 tickTime)长度后 Zookeeper 服务器还没有收到客户端的返回信息,那么表明这个客户端连接失败。总的时间长度就是 52000=10 秒。
syncLimit:这个配置项标识 Leader 与 Follower 之间发送消息,请求和应答时间长度,最长不能超过多少个 tickTime 的时间长度,总的时间长度就是 2
2000=4 秒
server.A = B:C:D : A表示这个是第几号服务器,B 是这个服务器的 ip 地址;C 表示的是这个服务器与集群中的 Leader 服务器交换信息的端口;D 表示的是万一集群中的 Leader 服务器挂了,需要一个端口来重新进行选举,选出一个新的 Leader

  1. 创建myid文件:
    在集群模式下,需要通过myid来确定是哪一个server,上面配置的zoo.cfg中有一个值dataDir,在其指定的路径下新建一个文件myid

该文件中只需要写入相应的A值,如在server.0,该值就应该是0

  1. 执行运行脚本:
    需要到不同的zookeeper路径下去执行 ./zkServer.sh start, 由于这种方式,导致我们没有配置相应的环境变量,存在找不到conf/路径的风险,所以在执行这个脚本的时候,最好能指定下配置文件的路径,如:

./zkServer.sh start ../conf/zoo0.cfg

  1. 附:按目录二结构进行搭建:
    在ZK的目录下面新建3个data文件夹,每个文件夹中分别新建myid文件,同方式一。

conf/ 路径下新建3个zoo.cfg 文件,每个文件的配置同目录一。

  1. 注意的问题:
  2. 在启动./zkServer.sh start ../conf/zoo0.cfg,这时候去检查ZK,./zkCli.sh -server 10.20.151.34:2181,会出现这样的情况: java.net.ConnectException: Connection refused ,详细看下图。

一、ZooKeeper简介

ZooKeeper作为分布式系统中重要的组件,目前在业界使用越来越广泛,ZooKeeper的使用场景非常多,以下是几种典型的应用场景:
l 数据发布与订阅(配置中心)
l 负载均衡
l 命名服务(Naming Service)
l 分布式通知/协调
l 集群管理与Master选举
l 分布式锁
zk环境搭建

这里不详细说明,提供详细blog说明。
Zookeeper集群搭建:http://www.cnblogs.com/linuxbug/p/4840137.html
Zookeeper配置文件详解:http://www.cnblogs.com/linuxbug/p/4840136.html
Zookeeper常用四字命令:http://www.cnblogs.com/linuxbug/p/4840135.html
二、ZooKeeper监控

在部门内部,有不少应用已经强依赖ZooKeeper,ZooKeeper的工作状态直接影响它们的正常工作。先来看一看哪些因素对ZooKeeper正常工作有比较大的影响:

影响ZooKeeper工作的主要因素
l 用于zookeeper写事务日志的目录要有足够大小,并且强烈建议在单独的磁盘(挂载点)上,这是影响ZK性能最大因素之一。
l 连接数。
l 注册的Watcher数。
l ZNode是否可读,可写。
l ZK事件通知的延时是否过大。

针对监控平台的以上几点要求,部内内部选用了目前使用业界已经比较成熟的阿里开源ZooKeeper监控框架TaoKeeper。
TaoKeeper源码及搭建方法参考 https://github.com/alibaba/taokeeper

TaoKeeper介绍
TaoKeeper是阿里开源ZooKeeper监控告警框架,提供以下功能:
l CPU/MEM/LOAD的监控
l ZK日志目录所在磁盘剩余空间监控
l 单机连接数的峰值报警
l 单机 Watcher数的峰值报警
l 节点自检:是指对集群中每个IP所在ZK节点上的PATH: /YINSHI.MONITOR.ALIVE.CHECK 定期进行三次如下流程 : 节点连接 - 数据发布 - 修改通知 - 获取数据 - 数据对比, 在指定的延时内,三次流程均成功视为该节点处于正常状态。

工作原理
Taokeeper通过SSH连接到ZooKeeper部署的机器上,再在上面执行ZooKeeper的四字命令来得到统计信息,再分析保存到mysql数据库中。
监控目标机器的负载,也是通过SSH连接到目标机器,再执行top等命令,再分析得到数据。
常见四字命令:
l echo stat|nc 127.0.0.1 2181 来查看哪个节点被选择作为follower或者leader
l echo ruok|nc 127.0.0.1 2181 测试是否启动了该Server,若回复imok表示已经启动。
l echo cons | nc 127.0.0.1 2181 列出所有连接到服务器的客户端的完全的连接/会话的详情。
l echo wchs | nc 127.0.0.1 2181 列出服务器 watch 的详细信息。

注意事项
1 taokeeper通过ssh信道到访登录每台机器,需要打开ssh的password登陆方式,不然taokeeper运行时会出现authentication failed错误。打开方式如下:
l 对于contos机器(sshd版本为标准OpenSSL):需要把sshd配置文件中(本机为/etc/ssh/sshd_config.l)中PasswordAuthentication变量设置成yes;
l 对于suse机器(sshd版本为SSH Secure Shell):需要把sshd配置文件中(本机为/etc/ssh2/sshd2_config.l)中AllowedAuthentications变量加上password(AllowedAuthentications publickey,keyboard-interactive,password);
2 监控的每台机器需要安装nc命令(suse中叫netcat,可以直接做个软链到nc)

使用TaoKeeper,目前已建立起部门内ZooKeeper的监控视图
ZooKeeper集群实时状态

三、ZooKeeper告警

TaoKeeper查看主要针对以下几个维度:
l ZooKeeper宕机告警
l 单机连接数超过阀值告警
l 单机Watch数超过阀值告警
l 磁盘,CPU,内存超过阀值告警

或自己使用四字命令+nc写脚本去做告警也行,这里不再详述。

http://blog.csdn.net/cruise_h/article/details/19046357

ls

linux: ls –fulltime
osx: stat -l -t “%F %T %z” *

find . -maxdepth 1 -printf “%M %n %-6u %-6g %6s %TY-%Tm-%Td %TT %TZ %f\n”|sort -k 9
gfind . -maxdepth 1 -printf “%M %n %-6u %-6g %6s %TY-%Tm-%Td %TT %TZ %f\n”|sort -k 9
but without the sort, columns don’t line up and the nanoseconds aren’t included. Plus the syntax for file selection is different and other options for ls aren’t available or are different.
In Mac OSX, gfind is needed (brew install gfind) (and note that the granularity will only be in whole seconds):

netstat

netstat -tunlp vs lsof -ni | grep LISTEN / netstat -anL
OS X has a netstat command, but it doesn’t display information about the programs associated with the network connections. If you want to see that, you need to use lsof instead. Note that it must be run as root (i.e. with sudo) in order to see other users’ programs:

1
2
3
4
5
sudo lsof -i
lsof also has many options for controlling what's displayed:
sudo lsof -i tcp -nP # show TCP unly (no UDP), and don't translate IP addrs and ports numbers to names

sudo lsof -i 6tcp -stcp:listen # show only IPv6 TCP ports in the listen state
sudo lsof -i @10.11.12.13 # show only connections to/from 10.11.12.13

shadowsocks:
https://blog.phpgao.com/shadowsocks_on_linux.html

nmap

macos下用 ipscan-mac
http://angryip.org/download/#mac
If you’re using nmap, MAC addresses are only available if you’re on the same network segment as the target. Newer versions of nmap will only show the MAC address to you if you’re running as root.

1
2
3
sudo nmap -sP -n 192.168.0.0/24
Use snmp-interfaces.nse lua script to get the MAC address of remote mashine like this:
nmap -sU -p 161 -T4 -d -v -n -Pn --script snmp-interfaces 80.234.33.182

配置ssh

#生成key
$ ssh-keygen -t rsa -C “your email”

#添加已有的key
ssh-add -K [path/to/your/ssh-key]

多个ssh key

git config user.name “用户名”
git config user.email “邮箱”

#生成ssh key时同时指定保存的文件名
ssh-keygen -t rsa -f ~/.ssh/id_rsa.sohu -C “email”

#测试是否可以连接
ssh -T git@github.com
ssh -T -p 443 git@ssh.github.com

#ssh config的格式

1
2
3
4
5
Host
User github.com-xxx
Hostname github.com
PreferredAuthentications publickey
IdentityFile ~/.ssh/id_rsa

修改.git文件夹下config中的url。

修改前
[remote “origin”]
url = https://github.com/humingx/humingx.github.io.git
fetch = +refs/heads/:refs/remotes/origin/
修改后

[remote "origin"]
url = git@github.com:humingx/humingx.github.io.git
fetch = +refs/heads/*:refs/remotes/origin/*

步骤

1
2
3
4
5
6
7
8
9
10
11
12
13
14
15
16
17
18
19
20
21
22
23
24
25
26
27
28
#git init的时候 创建了.git
git init
git remote add origin git@xxx.org:username/xxx.git

#添加文件到git index(即暂存区域), 这个时候 创建了.git下的 index , objects
git add .
#提交并且加注释 这时候创建 .git/refs/heads/master
git commit -am "init"
#推送 这时候会修改 .git/config 创建 .git/refs/heads/remotes
git push -u origin master

# 将本地修改提交到远程到master
1、提交修改:git add 文件路径/文件名
2、git commit -m 修改注释
3、git stash 修改过的被追踪的文件和暂存的变更——并将它保存到一个未完结变更的堆栈中,随时可以重新应用。
4、git pull
5、git stash pop stash 恢复储藏的工作
6、git push
# 步骤3--5 是防止在提交过程中和远程文件发生冲突。

# 类似svn export的功能
git archive master |tar -x -C /path
git archive master |bzip2 > xxxx.bz2
git archive --format zip --output /xxxx.zip master
git help archive

# 新增分支并切换过去
git checkout -b frag/deployment # 这个时候 .git/index .git/HEAD 会修改

解剖

Git 会创建一个 .git 目录, 这个目录

1
2
3
4
5
6
7
8
9
10
11
$ ls
HEAD #指向当前分支
branches/ # 新版本的 Git 不再使用
config # 项目特有的配置选项
description # 仅供 GitWeb 程序使用
hooks/ #客户端或服务端钩子脚本。
index # 保存了暂存区域信息 实际上就是一个包含文件索引的目录树,像是一个虚拟的工作区。在这个虚拟工作区的目录树中,记录了文件名、文件的状态信息(时间戳、文件长度等)
info/ # 保存了一份不希望在 .gitignore 文件中管理的忽略模式 (ignored patterns) 的全局可执行文件。
objects/ # 存储所有数据内容
refs/ # 存储指向数据 (分支) 的提交对象的指针
HEAD 及 index 文件,objects 及 refs 目录。这些是 Git 的核心部分

.git/refs 目录下有三个子目录:

heads 保存本地的分支 比如master/deploy/release master内柔是串文本,指向了一个 Commit 对象
remotes 保存远程仓库的分支
tags 保存所有的 tag
参考

详解

底层命令plumbing: Unix风格的:checkout, branch, remote 等共约 30 个 Git 命令
高层命令Porcelain

git add files 把当前文件放入暂存区域。
git commit 给暂存区域生成快照并提交。
git reset – files 用来撤销最后一次git add files,你也可以用git reset 撤销所有暂存区域文件。
git checkout – files 把文件从暂存区域复制到工作目录,用来丢弃本地修改。 会用暂存区全部或指定的文件替换工作区的文件。这个操作很危险,会清除工作区中未添加到暂存区的改动<`

>                                -- History ---

git reset –file ^| | git commit
— Stage —-
git checkout ^| | git add files
____Working—-

1
2
3
4
5
6
7
8
9
10
11
12
13
14
15
git commit -a 相当于运行 git add 把所有当前目录下的文件加入暂存区域再运行。git commit.
git commit files 进行一次包含最后一次提交加上工作目录中文件快照的提交。并且文件被添加到暂存区域。
git checkout HEAD <files> 回滚到复制最后一次提交。 会用 HEAD 指向的 master 分支中的全部或者部分文件替换暂存区和以及工作区中的文件。这个命令也是极具危险性的,因为不但会清除工作区中未提交的改动,也会清除暂存区中未提交的改 动。
git rm --cached <file>" 命令时,会直接从暂存区删除文件

[Display_Text](https://marklodato.github.io/visual-git-guide/conventions.svg)


### 进阶
简单理解:
工作区(Working Directory): 即操作的文件
暂存区 (Stage Index): 即 .git/index保存的目录树 和 对应的 .git/objects里面保存的数据
版本仓库/对象库(History) : 即 .git/refs/master 和其对应内容

> git对象

echo 'test content' | git hash-object -w --stdin
find .git/objects -type f
git cat-file -p d670460b4b4aece5915caf5c68d12f560a9fe3e4
git cat-file -t fdf4fc3
1
2
3

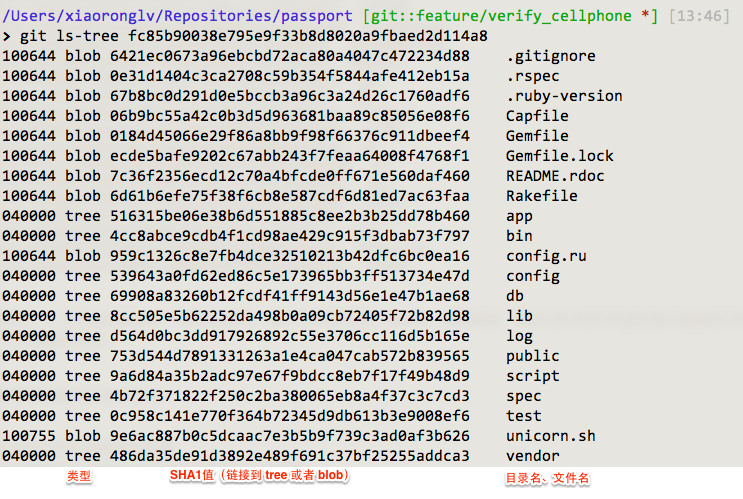
> tree 对象对应于 UNIX 中的目录 一个单独的 tree 对象包含一条或多条 tree 记录 一个单独的 tree 对象包含一条或多条 tree 记录,每一条记录含有一个指向 blob 或子 tree 对象的 SHA-1 指针,并附有该对象的权限模式 (mode)、类型和文件名信息
就是一大坨指针
# 用这个命令可以看到tree对象 git cat-file -p master^{tree}

100644 blob 9f0bc480dad89d2ef1f9983b39554c85eb0d3e79 README
```
Some_Text

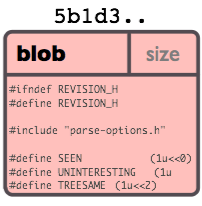
blob 对象则大致对应于 inodes 或文件内容
Some_Text
Commit 对象
一个 commit 对象由以下几部分组成
作者
提交者
注释
指向一个 big tree 的指针
Some_Text

怎么理解暂存区 ? http://www.worldhello.net/2010/11/30/2166.html
http://iissnan.com/progit/html/zh/ch9_2.html

Git内部原理
http://www.worldhello.net/2010/11/30/2166.html

参考
http://riny.net/2014/git-ssh-key/
https://segmentfault.com/q/1010000000835302
http://riny.net/2014/git-ssh-key/
http://www.cnblogs.com/hero4china/p/windows_git.html
http://mednoter.com/git-object.html

iptables

iptables的工作流程大体上可以表达为三种

源地址发送数据–> {PREROUTING–>路由规则–>POSTROUTING} –>目的地址接收到数据
源地址发送数据–> {PREROUTING–>INPUT–>本机}
{本机–>OUTPUT–>POSTROUTING} –>目的地址接收到数据
不考虑地址转发的情况下,例如一台独立的主机的网络管理,我们只需要配置INPUT和OUTPUT两条链即可完成对网络的管理
实例
iptables
-L 查看
-F 清除所有规则
-X 清除自定义链
-Z 清除所有链统计
-n的含义是用ip和端口的方式来显示规则

1
2
3
4
5
6
7
8
9
10
11
12
13
14
15
16
17
18
19
20
 iptables -t filter -L -n   查看filter表中的所有规则 
iptables -t filter -F 清空filter表中的规则
首先要牢记iptables是有链 有表的结构 , 那么定义每一条链上的每一条表的默认规则的格式为
iptables -t 表 -P 链 动作类型
-t 就不说了 -P 这里要大写 链的名称也是大小写敏感的注意不要写错 动作类型有ACCEPT允许通过 DROP丢弃 也就是禁止 还有一种动作是LOG作为日志记录,目前我还没有用过。
iptables -t filter -P INPUT ACCEPT #设置INPUT链上filter表默认规则

这里要注意的是,默认允许了所有的链接都可以通过,到达服务器。这样的设置在正式生产服务器环境上是十分危险的,不建议这么设置,应当设置为DROP,但是默认允许所有的链接都禁止的后果就是把自己的远程操作也踢掉了,服务器在本地还无所谓,但是在远程这就麻烦了。于是要牢记,默认规则要在设置好自己访问的规则以后再设置,最好是在最后设置。
iptables -A INPUT -i eth0 -s 192.168.1.110 -j DROP #禁止ip为192.168.1.110的计算机访问本机eth0网卡
iptables -A OUTPUT -o eth0 -d 192.168.1.110 -j DROP 禁止本机访问192.168.1.110可以这么写
iptables -A INPUT -i lo -j ACCEPT 允许本机访问本地回环网卡 localhost
iptables -A OUTPUT -o lo -j ACCEPT
iptables -A INPUT -i eth0 -s 192.168.1.0/24 -j DROP 禁止192.168.1.xxx 这个网段所有的IP访问本机,24其实指的是二进制的从左到右 有241 ,在IPV4的ip地址表示方法下 有32位,那么32-24=8 也就是十进制IP最后一段位置代表是0
iptables -A 链 -io 网卡 -p 协议 -s 源ip --sport 源端口 -d 目标ip --dport 目标端口 -j 动作
和IP一样 链的不同(可能是INPUT也可能是OUTPUT) 使用不同的-i或者-o
-p是小写的。 代表协议,类型可以是tcp、udp、icmp或者all,特别是要注意的是我们平时使用的ping命令 其实是icmp协议,而这个协议比较特殊,不使用端口 所以在使用all的时候(包含icmp)同时设置端口可能会出错!
INPUT要有源,OUTPUT要有目标,但是INPUT往往是限制目标端口,OUTPUT往往是限制源端口,注意逻辑不要乱。
iptables -A INPUT -p tcp --dport 80 -j ACCEPT # web服务器添加80服务
iptables -A INPUT -p tcp -s 192.168.1.0/24 --dport 3306 -j ACCEPT 允许192.168.1.x网段访问mysql数据库
iptables -I INPUT 1 -p tcp --dport 80 -j ACCEPT # 1代表了第一位顺序 也就是最优先的匹配规则

有多条规则匹配一次访问的时候,以最前面的规则为准,当无法匹配到对应规则的时候,使用默认规则
开机自启动
chkconfig iptables on
service iptables save
上面的命令其实是把规则保存在/etc/sysconfig/iptables文件中,重启会自动读取
如果是业务相对固定的服务器这样做无所谓,但如果需要经常切换规则,那么讲规则都写在这一个文件中并不是十分容易管理
可以把规则写成单独的文件,在开机的时候自动载入(/etc/rc.local中添加),但是要注意权限设置(755),这样做的好处是便于管理,缺点是只有开机的时候有效
如果是重启防火墙服务,则无法载入对应规则。

mac下, 以前用的是ipsw, 现在用的是pf

Port Forwarding in Mavericks
Since Mavericks stopped using the deprecated ipfw (as of Mountain Lion), we’ll be using pf to allow port forwarding.

  1. anchor file
    Create an anchor file under /etc/pf.anchors/ with your redirection rule like:
    rdr pass on lo0 inet proto tcp from any to 127.0.0.2 port 80 -> 127.0.0.1 port 40070
  2. Test the anchor file
    Parse and test your anchor file to make sure there are no errors:
    sudo pfctl -vnf
  3. Reference the anchor in pf.conf
    /etc/pf.conf is the main configuration file that pf loads at boot. We’ll need to load the anchor file we previously created:
    rdr-anchor “forwarding”
    load anchor “forwarding” from “/etc/pf.anchors/
    Make sure to add these entries to the appropriate spot.
  4. Load and enabling pf
    pf is not enabled by default in Mavericks, few ways to enable this:
    Manually load and enable from a pf.conf file via sudo pfctl -ef
    Auto enable by creating a launch daemon via this doc to run pfctl -ef on boot.
    Auto enable by adding an -e(enable) to the pfctl ProgramArgument in /System/Library/LaunchDaemons/com.apple.pfctl.plist like this:
    ProgramArguments
    pfctl
    -e
    -f
    /etc/pf.conf
  5. Forwarding across interfaces
    By default, pf does not forward between interfaces. Here’s a snippet from man for pfctl with help from 2sidedfigure:
    The packet filter does not itself forward packets between interfaces. Forwarding can be enabled by setting the sysctl(8) variables net.inet.ip.forwarding and/or net.inet6.ip6.forwarding to 1. Set them permanently in sysctl.conf(5).
    We’ll need to enable this by adding to /etc/sysctl.conf:
    net.inet.ip.forwarding=1
    net.inet6.ip6.forwarding=1
    There is the possibility that pf.conf will be overriden with updates to the OS. It might be best to create your own pf config file and load them in additon to the main pf.conf to prevent this.

ref:
https://gist.github.com/kujohn/7209628
https://gist.github.com/zhoutong/8adca7038639f0f5fb0e
http://blog.csdn.net/dog250/article/details/8944111

编辑器

由于使用sublime,因此博主使用的是sublime的插件ominiMarkupPreviewer进行编辑

  1. 在线

  2. 本地

常用语法速查

  1. 标题 (Headings)

    1
    2
    3
    # 这是 H1 <一级标题>
    ## 这是 H2 <二级标题>
    ###### 这是 H6 <六级标题>
  2. 文字格式 (Styling text)

    1
    2
    3
    4
    **这是文字粗体格式**
    *这是文字斜体格式*
    _这是文字粗斜体格式_
    ~~在文字上添加删除线~~

    这是文字粗体格式
    这是文字斜体格式
    这是文字粗斜体格式
    在文字上添加删除线

  3. 列表 (List)

    • 无序列表

      1
      2
      3
      * 项目1
      * 项目2
      * 项目3
    • 有序列表

      1
      2
      3
      4
      5
      1. 项目1
      2. 项目2
      3. 项目3
      * 项目1
      * 项目2
  4. 引用 (Blockquotes)

    1
    2
    3
    4
    #可以不用每行都写一个
    > Pardon my french
    #可以嵌套
    >> asdfasdf

    Pardon my french

    Echo1 Here
    

    asdfasdf

  5. 段落缩进

    1
    2
    3
    &ensp;或&#8194;半方大的空白
    &emsp;或&#8195;全方大的空白
    不断行的空白格&nbsp;或&#160;不断行的空白格

      段落:半方大的空白
      段落:全方大的空白
    不断行的空白格  不断行的空白格

  6. github特有的markdown格式
    https://guides.github.com/features/mastering-markdown/
    https://help.github.com/articles/github-flavored-markdown
    https://help.github.com/articles/writing-on-github
    比如 emoji: :sparkles: :camel: :boom:

    • [x] This is a complete item
    • [ ] This is an incomplete item
      hexo中使用emoji
      1
      2
      3
      4
      5
      {% emoji heart 32 custom_class1,custom_class2 %}
      {% emoji-block %}

      Lorem ipsum dolor sit amet :smiley:
      consectetur adipisicing elit :boom:
      {% endemoji-block %}
  7. 图像

    1
    ![example](http://leanote.com/public/upload/528/5467be5d38f411286b00007b/images/logo/bbd3593e5c2bd29e129c0eb740193969.jpeg)

    example

    图片居中

    1
    2
    3
    #上面加一个
    <div style="text-align:center" markdown="1">
    ![example](http://leanote.com/public/upload/528/5467be5d38f411286b00007b/images/logo/bbd3593e5c2bd29e129c0eb740193969.jpeg)


    example

    如果拷贝了别人的图片插入到自己的博客中,最好在图片上给出一个超链接指向源头,方便追溯出处。

    1
    [![example](http://leanote.com/public/upload/528/5467be5d38f411286b00007b/images/logo/bbd3593e5c2bd29e129c0eb740193969.jpeg "haroopad")](http://blog.leanote.com/post/freewalk/Markdown-语法手册)

    example

  8. 链接

    • 自动式

      1
      <http://example.com/>

      http://example.com/

    • 行内式

      1
      [Display_Text](http://example.com/ "http://example.com/")
    • 参考式

      1
      2
      我经常去的几个网站[Leanote][1] 
      [Leanote 笔记][1]
    • 锚点
      用普通的html

      1
      <a href="#end">bookmark_text</a>

      效果: bookmark_text

  9. 注脚 1

    1
    2
    3
    4
    5
    6
    注脚与注脚之间必须空一行,不然会失效
    使用 Markdown[^1]可以效率的书写文档, 直接转换成 HTML[^2], 你可以使用 Leanote[^Le] 编辑器进行书写。

    被添加脚注的词条后面会出现一个超链接数字(有的渲染为上标格式),点击数字跳转到文末 glossary 区域该脚注的定义处。文末 glossary 区域该脚注定义的行尾会添加一个回车符号(↵),点击可回到被标注的脚注点。

    测试 Hexo3.0 有些主题不支持footnote, 可以参考<http://nsfw.hjwu.me/2014-07-07/hexo-plugin-for-parse-footnotes/>
  10. 嵌入代码

    单行的时候用 `asdf`
    多行的时候用

    ```
    aaaaaa
    ```

    比如

    1
    Here's an idea: why don't we take `SuperiorProject` and turn it into `**Reasonable**Project`.

    Here’s an idea: why don’t we take SuperiorProject and turn it into **Reasonable**Project.

    嵌入代码里面用反引号怎么办? 参考这里

    1
    2
    3
    4
    5
    6
    7
    A single backtick in a code span: `` ` ``

    A backtick-delimited string in a code span: `` `foo` ``

    `&#8212;` is the decimal-encoded equivalent of `&mdash;`.

    ``git archive master --format=zip > `git describe master`.zip``

    会得到:
    A single backtick in a code span: `
    A backtick-delimited string in a code span: `foo`
    &#8212; is the decimal-encoded equivalent of &mdash;.
    git archive master --format=zip > `git describe master`.zip

    标准 Markdown 不支持脚标, 只能通过内嵌 HTML 的<sup><sub>标签来实现
    比如 H<sub>2</sub>O 将生成 H2O

    可以直接在反引号里面写html代码

    1
    2
    3
    4
    5
    6
    7
    8
    9
    10
    11
    12
    13
    <table>
    <tr>
    <th rowspan="2">值班人员</th>
    <th>星期一</th>
    <th>星期二</th>
    <th>星期三</th>
    </tr>
    <tr>
    <td>李强</td>
    <td>张明</td>
    <td>王平</td>
    </tr>
    </table>
  11. 表格

    1
    2
    3
    4
    5
    6
    7
    8
    9
    10
    |产品|价格|
    |---|--:|
    |Leanote 高级账号|60元/年|
    |Leanote 超级账号|120元/年 `print("Format with CodeRay")`|

    |学号|姓名|分数|
    |------|-----|---------|
    |小明|男|75|
    |小红|女|79|
    |小陆|男|92|
  12. 分割线

    1
    2
    3
    4
    5
    * * *
    ***
    *****
    - - -
    ---------------------------------------
  13. LaTex公式

    • $ 表示行内公式:

      1
      质能守恒方程可以用一个很简洁的方程式 $E=mc^2$ 来表达。

      质能守恒方程可以用一个很简洁的方程式 $E=mc^2$ 来表达。

    • $$ 表示整行公式:每个公式要隔一行

      1
      2
      3
      $$\sum_{i=1}^n a_i=0$$
      $$f(x_1,x_x,\ldots,x_n) = x_1^2 + x_2^2 + \cdots + x_n^2 $$
      $$\sum^{j-1}_{k=0}{\widehat{\gamma}_{kj} z_k}$$ #测试不成功

      $$\sum_{i=1}^n a_i=0$$

      $$f(x_1,x_x,\ldots,x_n) = x_1^2 + x_2^2 + \cdots + x_n^2 $$

      $$ {\gamma} $$

  14. 流程图 更多

    1
    2
    3
    4
    5
    6
    7
    8
    9
    10
    flow
    st=>start: Start:>https://www.zybuluo.com
    io=>inputoutput: verification
    op=>operation: Your Operation
    cond=>condition: Yes or No?
    sub=>subroutine: Your Subroutine
    e=>end
    st->io->op->cond
    cond(yes)->e
    cond(no)->sub->io
  15. 序列图

  16. 其他

    [TOC]
    [图标](http://fortawesome.github.io/Font-Awesome/3.2.1/icons/ "http://fortawesome.github.io/Font-Awesome/3.2.1/icons/")
    

The end!

参考
Markdown-语法手册
Mastering Markdown
Markdown详解
Hexo
Hexo进阶


  1. Footnote_Text